Define the failed area before choosing the repair
Render Repairs Crewe | From Defect Assessment to Finished Patch
Render damage can begin as a small mark beside an opening or a larger area that looks uneven and loose. The repair needs to address the affected layers and the reason they failed. A useful proposal distinguishes what can remain from what must be replaced, then explains the appearance to expect. A new coat of colour can follow the repair where appropriate, but it cannot substitute for understanding the condition beneath it.

On this page
Locate the defect within the building's history
Recent window work, a new lintel, an old leak or a changed pipe route can be relevant to a damaged area. Provide that information without assuming it proves the cause. Photographs should show the defect and its surroundings, with a note of when it was first noticed and whether it has changed. This helps the assessment begin with the actual building rather than a generic crack description. Do not disturb loose material to investigate it yourself, particularly where it could fall or where the wall's condition is uncertain.
Cracks associated with continuing movement or a visibly distorted wall may require advice from the appropriate qualified professional before surface work is agreed. A renderer's inspection of the covering is not automatically a structural assessment. The finishing proposal should follow any relevant findings and underlying repairs. That distinction prevents a cosmetic patch from being presented as an answer to a problem outside its scope. Once the supporting condition is understood, the repair can be designed for the material that is actually there.
- Map the damage Tapping finds hollow areas; cracks and their likely cause are noted.
- Cut back Failed render is cut out to a sound edge, usually squared off.
- Fix the cause Leaking gutters, sills without drips or render below the DPC are dealt with.
- Rebuild in coats Using a material compatible with the surrounding render and masonry.
- Blend the finish Texture is matched; colour may need a coating over the wider area.
The usual order of work. The survey and the chosen products decide the actual steps.
Establish the depth as well as the outline
The visible damaged face may not show the full extent of detachment or weak material. The assessment should identify which layers need replacement and where suitable retained material begins. If the extent can only be confirmed during preparation, the quote should explain how that will be agreed. A marked elevation or photograph is useful for communicating the area, while the written specification describes the build-up. A broad instruction to fill cracks leaves too much uncertainty about what is being repaired.
| Question | Why it matters |
|---|---|
| Which layer has failed? | Paint, finish and deeper render need different treatment |
| What caused the damage? | An unresolved leak or movement can affect the new work |
| How far does weakness extend? | The visible mark may not be the final repair boundary |
| What material remains? | The replacement must suit its background and neighbours |
| How should it look? | Texture and colour matching need realistic agreement |
Repair the junction that keeps causing trouble
A patch beside a sill, pipe or frame can fail again if the associated detail remains defective. Identify the required correction and the trade responsible for it. The programme should allow that work before the render is reinstated and decorated. A quotation that excludes all associated work without acknowledging its necessity leaves the owner with an incomplete solution. The scope should connect the repair to the condition that affects it, even where the related operation is contracted separately.
Altered openings also create changes in background. A repair around new masonry or a lintel needs to fit the construction and the selected system. It should not assume that an extra layer of reinforcement resolves every movement or support question. The wall-rendering guide explains the wider treatment where an entire face is being renewed. For a local patch, the same interface still needs a deliberate detail rather than an improvised bridge between materials that have not been assessed together.
Match the material to the retained covering
If the original system can be identified, its repair guidance is an important starting point. If not, the assessment should establish a suitable compatible method rather than select a patch material solely because it is convenient or quick-setting. On traditional fabric, lime repairs may be appropriate. A harder material is not automatically a better neighbour to soft masonry or older render. The choice should consider the background, retained layers and finishing treatment as a complete local repair.
Removal also needs to be proportionate. Sound surrounding material can be valuable, while leaving loose material at the edge undermines the new patch. A controlled removal trial may help in uncertain areas, particularly where a hard covering is strongly bonded to a vulnerable background. The objective is a defined, serviceable repair, not the maximum possible area stripped away. Where failure is widespread, a larger replacement can be justified, but its extent should follow the findings rather than a preference for starting from bare masonry everywhere.
Agree the visual result in more than one dimension
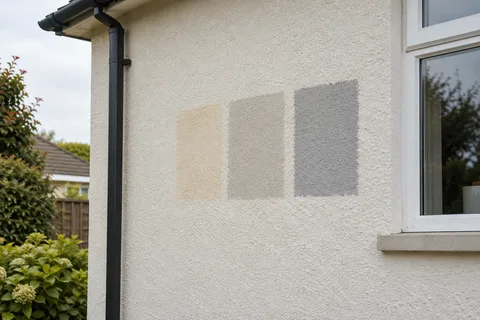
A patch can differ in grain, level and profile even when its colour is close. Weathered surfaces are particularly difficult to reproduce exactly. A sample can show the likely relationship and help decide whether decoration across a defined panel is desirable. It should not be assumed that a coating will hide a physically uneven repair. The preparation and finish standard need to address the shape first, with colour considered alongside it rather than used to obscure the difference.
The respray guide distinguishes coating work from wall repairs. Combining the two in one project can be sensible, provided the quotation separates the operations and identifies the retained surface. Some owners prefer a visible local repair that preserves sound material; others choose a wider refurbishment for a more uniform appearance. Both decisions are easier when the proposal is candid about what can realistically be matched and what a broader treatment would change.
Finish the job with a clear record
The programme should allow appropriate access, protection and curing for the selected material. A small patch may involve several visits, especially when other-trade work is needed first. At completion, inspect the repair boundary and associated fitting as well as the visible finish. Keep the material, colour and location information with the property records. The house-rendering page can help place repairs within a longer refurbishment plan, and the Crewe homepage links the other services. A well-specified patch should resolve a defined defect and leave a useful record for the next person maintaining the exterior.
Common questions
Can a hairline crack always be left until repainting?
Its depth, position, history and cause need consideration. Some fine surface defects differ substantially from cracks involving deeper layers or movement. A photograph or width alone cannot establish the appropriate response. Assessment should precede the decision to fill, monitor or investigate further.
Will a repaired area need a new colour coat?
That depends on the material and the intended appearance. Some repairs can remain as finished; others may be followed by a compatible decorative treatment. The quotation should identify whether coating is included and whether it covers the patch or a wider defined area.
See housing and planning information for Crewe and nearby places, including the source and geography behind each figure.